Hammer not cocking
Printed From: The Carbine Collector's Club
Category: The Club
Forum Name: Safety/ Accuracy/Shooting/Ammunition/Care and Maintenance
Forum Description: What to Check, Reloading, Tips for Accuracy, Competitive/Recreational Shooting
URL: http://www.uscarbinecal30.com/forum/forum_posts.asp?TID=5449
Printed Date: Apr 23 2024 at 3:16pm
Software Version: Web Wiz Forums 12.01 - http://www.webwizforums.com
Topic: Hammer not cocking
Posted By: Mmr61184
Subject: Hammer not cocking
Date Posted: May 02 2021 at 10:51am
|
just bought my first carbine and completely broke it down to get all of the old grease and junk off and get it looking and functioning nice. Everything went back together no problem when I go to rack it the hammer won’t stay cocked. If it take it out of the stock and pull back real hard I can the hammer to stay back 30% of the time but never while in the stock. Did I do something wrong reassembling? Is it the springs. I have a video for reference https://imgur.com/gallery/yySd2fO" rel="nofollow - https://imgur.com/gallery/yySd2fO
|
Replies:
Posted By: W5USMC
Date Posted: May 02 2021 at 11:29am
|
Same issue was just discussed on MILSURPS, check out the below thread for answers. https://www.milsurps.com/showthread.php?t=73917" rel="nofollow - Help with a family M1 carbine (milsurps.com) ------------- Wayne USMC Retired NRA Life Member |
Posted By: New2brass
Date Posted: May 02 2021 at 11:31am
|
check you have the trigger spring in correctly, it looks like the triggers is not reset. if not take out the trigger sear and sear spring. Assemble out of the housing. Check the sear function. the sear should push back as well as pivot ------------- http://www.uscarbinecal30.com/forum/club-assistance-saginaw-receivers_topic4716.html" rel="nofollow - Club Survey Saginaw Receivers |
Posted By: GotSnlB28
Date Posted: May 02 2021 at 12:08pm
| I think Dan's right. Tip on easy assembly, cut a Q-tip the width of the trigger, that allows you to assemble the trigger, sear spring, and sear outside of the housing. Then just push the Q-tip out with the trigger pin. Insert the trigger spring at 90 degrees and over the shelf at the top rear of the trigger, rotate 90 degrees into place. |
Posted By: Mmr61184
Date Posted: May 02 2021 at 1:01pm
| that trigger spring is a pain in the ass to get in think that was the hardest pet of reassembly. Is it possible I messed it up squeezing it back into that hole |
Posted By: W5USMC
Date Posted: May 02 2021 at 1:20pm
|
@ Mmr, if you do not have the trigger spring tool you can use an empty carbine bullet casing, spring is inserted through the hole in the back of the housing. ------------- Wayne USMC Retired NRA Life Member |
Posted By: GotSnlB28
Date Posted: May 02 2021 at 1:21pm
| If you don't have the GI trigger spring tool a bic pen body will work. |
Posted By: floydthecat
Date Posted: May 02 2021 at 1:32pm
| Must be a dozen ways to do it. I pull it thru with dental floss or a small tie-wrap. All of them work, but the trick is to get the foot to sit in the notch on the trigger. |
Posted By: Mmr61184
Date Posted: May 02 2021 at 2:01pm
| oh sh*t goes in the back. Oops |
Posted By: 35 Whelen
Date Posted: May 02 2021 at 2:41pm

|
Posted By: painter777
Date Posted: May 02 2021 at 4:57pm
|
Here is JimF's pics and tutorial on how to make a pin to put the sear, sear spring and trigger together outside the housing. I made my pin from a cut down finish nail. "Trigger and sear/spring. Make a small pin the width of the trigger. Assemble the trigger sear and spring outside the housing using the shorter pin. Drop it in the housing, line up the hole and push the normal pin into place. Done deal, a minute or two and no jammed fingers." 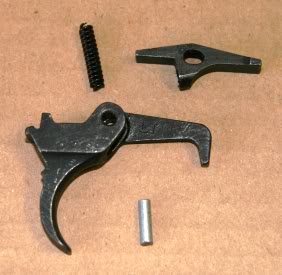    Video link to fellow member Norowich93cmp Youtube videos. See his full playlist for many M1 Carbine 'How To' https://www.youtube.com/watch?v=1izVaSwW4nI&list=PLfLKBFGQhTSk_qlQUQAY84WrZKeowzkzp&index=10" rel="nofollow - https://www.youtube.com/watch?v=1izVaSwW4nI&list=PLfLKBFGQhTSk_qlQUQAY84WrZKeowzkzp&index=10 HTH, Ch-P777 ------------- Living Free because of those that serve..... |
Posted By: Mmr61184
Date Posted: May 02 2021 at 10:56pm
 Is it because the spring coil is bent ?
|
Posted By: painter777
Date Posted: May 02 2021 at 11:02pm
|
Probably, You could try bending it back in place, install and see it hammer cocks. But order a new one. Ebay or Gunbroker will have them. Could even run a WTB here on the Forum. Ch-P777 ------------- Living Free because of those that serve..... |
Posted By: kro1970
Date Posted: May 02 2021 at 11:05pm
| Looks like one leg of the spring is broken. |
Posted By: Mmr61184
Date Posted: May 02 2021 at 11:12pm
| yeah I took it apart 4 times. Is it worth ordering a new sear too? |
Posted By: floydthecat
Date Posted: May 03 2021 at 5:45am
Sears are pretty durable. Unless you see some physical damage or wear probably not. You can post some pictures for opinions.
|
 Mmr61184 wrote:
Posted By: Mmr61184
Date Posted: May 03 2021 at 7:57pm
| took everything apart again the seat is definitely not worn at least from what I see. I ordered a new trigger spring and hammer spring but didn’t get a new sear spring yet. Seems really strange, I am by no means an expert but would never guess the trigger spring would create this problem |
Posted By: Smokpole
Date Posted: May 03 2021 at 8:03pm
|
Without the second arm, it doesn't have the strength to reset the trigger. That is where the problem is. ------------- OGCA Life member NRA Life member Ashtabula Rod and Gun Life member |
Posted By: Mmr61184
Date Posted: May 03 2021 at 8:24pm
If it is a simple as that I will be so happy
|
Posted By: painter777
Date Posted: May 03 2021 at 9:42pm
|
See this video and compare to your Sear's movement: https://www.milsurps.com/showthread.php?t=17368" rel="nofollow - https://www.milsurps.com/showthread.php?t=17368 ------------- Living Free because of those that serve..... |
Posted By: Mmr61184
Date Posted: May 03 2021 at 10:02pm
| yup moves exactly like that, I am going to start with the trigger spring and see if that does anything. Ordered one on ebay last night just waiting next to the mailbox for it to come now |
Posted By: Mmr61184
Date Posted: May 05 2021 at 7:34pm
| new trigger springs came this afternoon, same results. |
Posted By: W5USMC
Date Posted: May 05 2021 at 8:16pm
|
Hmm, a new sear was the answer to the MILSURPS member's problem, maybe that is the route you should take next. ------------- Wayne USMC Retired NRA Life Member |
Posted By: Mmr61184
Date Posted: May 05 2021 at 8:20pm
| funny you say that he DMed me the next day and said that worked. I ordered a sear just waiting for it to ship |
Posted By: Mmr61184
Date Posted: May 07 2021 at 4:01pm
|
figured out the problem, it was the hammer. I ordered new springs a hammer and a sear when all this started. The hammer came today so I figured I would try it. I popped it in and worked perfectly. I took the two hammers and compared as you see in the pic below the front hammer my original doesn’t have the groove that the sear sits in, it’s worn down. Next question is should I order a backup hammer to keep for spare parts eBay has a Winchester NOS which would keep my rifle all correct. I will be shooting this gun, won’t be a ton but also want to avaoid not having a part if I need it  |
Posted By: 35 Whelen
Date Posted: May 07 2021 at 5:33pm
|
Good job figuring that out! I don't know that you need a spare hammer around, but it won't hurt. Sarco has pretty fait prices on genuine GI parts.
|
Posted By: New2brass
Date Posted: May 07 2021 at 5:45pm
|
the front hammer is a wartime replacment made by white sewing machine. The rear is a Winchester. The sear does not sit in a groove. The nose of the sear hits the flat or ledge that both hammers have. Look at the last animation on this page http://www.uscarbinecal30.com/operation.html" rel="nofollow - http://www.uscarbinecal30.com/operation.html ------------- http://www.uscarbinecal30.com/forum/club-assistance-saginaw-receivers_topic4716.html" rel="nofollow - Club Survey Saginaw Receivers |
Posted By: Mmr61184
Date Posted: May 07 2021 at 6:38pm
That is impressive how can you tell that from a fuzzy picture
What caused the front hammer not to cock. The only difference I see is that ledge is more pronounced, does that cause the sear to make a better connection? What else could be wrong with it then. I would just like to know for my own knowledge
|
Posted By: painter777
Date Posted: May 08 2021 at 12:25am
|
*Possible the back end of the Sear was hitting the front of the trigger Pedestal, Instead of raised above it. Meaning the Sear couldn't ride back far enough so it's front edge couldn't catch the ledge/notch on the Hammer to stay cocked.* *Trigger Spring might have needed a little fussing around with to spread proper tension on the rear of the Trigger* *Hole in the Hammer may have been wobbled out and moving about with the pin installed.* Sometimes it's a just a single issue, sometimes it can be how 2 or 3 items need a little tweaking. Gotta expect a issue now and then with a 75+ year old weapon. Hammer Pin installed from Left to Right? Grease/Lube: I like to put a dab of grease in the Sear and Hammer pin holes. Light film of oil on top of the Trigger Pedestal where the Sear glides over it. History now, Glad you got her ready to run...  Just double check that the safety and trigger are working. Let us know how it shoots, Congrats, Ch-P777 ------------- Living Free because of those that serve..... |
Posted By: floydthecat
Date Posted: May 08 2021 at 6:38am
| I think what OP is referring to is the grove cut in the Winnie hammer at the base of the ledge. Not all hammers have this defined notch and I have only noticed it on Winnie hammers, but I have not paid attention to all manufactures of hammers. Why Winchester did that is up for discussion I suppose, but most hammers don’t and they all seem to work. |
Posted By: Mmr61184
Date Posted: May 08 2021 at 8:58am
| it was definitely the hammer, I took it apart 4 or 5 times with the old hammer. Changed out the hammer spring and the trigger spring all the same results. When I put the hammer in worked. Whatever it was it’s working which is the most important. Plus mine is Winchester so there is that added bonus now. Kind of crazy that the two manufactures use the same stamped letter. I guess nobody thought about collectibility in 80 years during the biggest war the world ever saw :) |
Posted By: New2brass
Date Posted: May 08 2021 at 8:59am
there is a possibility that the front hammer someone messed with trying to improve the trigger pull. The rear hammer appears to have some work in that area. Are you sure the rear one was not giving you the trouble? Does the sear have any metal in the white that looks like honing or fitting? One suggestion if you want to trouble shoot the problem would be to find a good hardware store that has dowel pins the same diameter of the hammer and trigger pins and are at least twice as long. You would put the pins through the trigger housing and assemble the parts on the pins outside of the trigger housing. From there you can manipulate the hammer and trigger to figure what is going on. I would do this on both sides of the trigger housing on the outside chance the trigger housing holes are off. the longer pins will multiply the error and may be easier to figure out. ------------- http://www.uscarbinecal30.com/forum/club-assistance-saginaw-receivers_topic4716.html" rel="nofollow - Club Survey Saginaw Receivers |
Posted By: W5USMC
Date Posted: May 08 2021 at 10:52am
|
@Mmr, have you received your new sear yet? When you do I would still be interested to know if just the new sear also fixes the issue using the old hammer. ------------- Wayne USMC Retired NRA Life Member |
Posted By: Mmr61184
Date Posted: May 08 2021 at 11:04am
| The hammer closest to the camera is my original the one that the gun is not cocking with. The hammer farthest from the camera (Winchester) is the new one that the gun is fully functioning with. That one is not a new hammer it was in a gun but looks to be used very little and in really good condition. Not sure how I would tell if somebody tried to modify it though. Sear looks fine to me I didn’t see any evidence or attempting to modify our grinding. I ordered a new sear that comes Monday so I can always test this by putting the original hammer back and see what effect the new sear has |
Posted By: Mmr61184
Date Posted: May 08 2021 at 11:05am
| comes Monday, was actually thinking the same thing and brought that up in my reply to new brass. It comes Monday so I will take it apart again and see how that works |
Posted By: Mmr61184
Date Posted: May 10 2021 at 3:51pm
|
new sear came in today. Don’t see much of a difference between the two, but my original hammer works with the new sear. What’s really strange is the new hammer works with both the old and new sear, so the sear being the wildcard I guess. Pictures of the old sear if you all would like to see   |
Posted By: W5USMC
Date Posted: May 10 2021 at 4:51pm
|
Had a feeling that the new sear was also going to fix the issue. Imagine that there was just enough wear between the old sear and the old hammer that they were no longer compatible. ------------- Wayne USMC Retired NRA Life Member |
Posted By: GotSnlB28
Date Posted: May 10 2021 at 5:00pm
| Not sure if it's just picture quality but when I enlarge the picture the finish at the edge of the suspect sear looks uneven. I do wonder if it was worked on a bit for one reason or the other. |
Posted By: Mmr61184
Date Posted: May 10 2021 at 6:19pm
| It does look a little worn but not that that noticeable unless you really look at it so probably picture quality. With the new sear the old hammer works perfectly fine |
Posted By: painter777
Date Posted: May 10 2021 at 7:04pm
|
@GotSnB28, The old sear also appears the edge having a uneven/angled taper to me also. Best I can see with zoomed pics. Pictures- That little flower symbol / Macro setting on your camera will shows details you can't see with the naked eye. Maybe the OP got lucky,
If that hammer was setting, but intermittently...... could it be a possibility it could have run 'Fast' AKA FA ? Best for the OP to test for safety. I've copied / pasted this from our fellow site. Please read thru and follow the steps to test. Included is a link you should Bookmark. http://www.90thidpg.us/Reference/Manuals/TM9-1276_1947.pdf" rel="nofollow - http://www.90thidpg.us/Reference/Man...-1276_1947.pdf Paragraph 11 Page 12-13 (6) (7) (2) (6) Engagement of sear with hammer. The sear should engage with sear notch in hammer when bolt is about halfway retracted. A crisp click may be heard as sear slides forward into the sear notch in hammer under force of sear spring. Retract the bolt fully to insure complete engagement and retention of sear. If click is not heard or trigger pull appears to be light or excessively heavy, examine sear and sear notch in hammer for wear, burs, foreign matter in sear notch, or weak or broken sear spring. Trigger pull should not be under 5 pounds or over 7 pounds. (7) Engagement of sear when trigger is not released. The sear should engage and hold the hammer when the trigger is held back and the slide operated rapidly. Test by grasping the carbine by the grip of the stock with the left hand with index finger on the trigger. Pull the trigger all the way to the rear and hold in that position. Grasp the operating slide handle with the right hand and move the bolt back and forth rapidly five or six times. Release the operating slide handle in the forward position, release the trigger, allowing it to move fully forward, and then pull it again. If the hammer does not fall, it has jarred out of engagement with the sear and followed the bolt forward. If this is the case, the carbine may fire full automatic and the firing mechanism should be inspected for worn or faulty parts. (2) Trigger. Trigger should move forward under force of trigger spring when released from rearward position. If trigger does not move forward positively, trigger spring may be broken, disengaged, or bent. Trigger hang is also caused by old type triggers with the 4° angle on the forward face of the pedestal. Test trigger pull as explained in paragraph 13. TESTING TRIGGER PULL is on page 15-16, reading in part: a. GENERAL. (1) Test trigger pull for smoothness and for pressure exerted. Trigger pull should be clean, without creep, smooth in action; and the force exerted to release hammer should be more than 5 pounds and less than 7 pounds (See b below.) If pull is rough, or not within specified limits, or creep is present, it indicates that there is wear or burs on sear nose, hammer notch, or top of trigger lip, or interference between trigger and housing. Read All of Inspection Paragraph 31, Starting on page 43.... 33. Maintenance and Repair Page 49 b. HAMMER FAILS TO COCK. This condition may be due to damaged sear, broken sear spring, burs or foreign matter in sear notch in hammer, or failure of bolt to move far enough to the rear on recoil movement to cock hammer. Examine parts; clean and replace if necessary. c. STONING NOSE OF SEAR. If sear nose or hammer notch becomes burred or unevenly worn, preventing proper seating of nose of sear in notch, the burs may be removed in an emergency, and uneven surface leveled with a fine grained sharpening stone. Stone surface to a polish only, being careful to maintain angle of face. Stoning should be done only by trained ordnance personnel. If possible, parts should be replaced by selective assembly. d. CORRECTING TRIGGER PULL. (1) A light or heavy trigger pull may be caused by foreign matter or burs in the sear notch in the hammer, on the nose of the sear, on the top of rear end lip of trigger where the rear end of sear rests, or in the elongated pivot hole in the sear. Such burs or foreign matter will prevent nose of the sear from seating fully in hammer notch. To correct, remove foreign matter or stone burred surfaces to a polish, using a fine grained sharpening stone, taking care to maintain surfaces, angle, and sharp edges. Replace badly burred or damaged parts. Stoning should be done only by trained ordnance personnel. (2) A light pull may also be due to a weak or broken sear spring which will not seat the sear fully in the hammer notch before the pressure from hammer spring is applied to the nose of sear through the hammer. Correct by removing foreign matter or replace sear spring. (3) Uneven surface of hammer notch or worn nose of sear may also cause a light pull. Correct by stoning surfaces evenly, being careful to maintain angles and sharp corners of faces stoned. 34. Functional Check Page 50-51 a. Cock hammer and check seating and positive retention to limit of sear nose in hammer notch. Continue to retract hammer of rearward movement and observe forward movement of sear to maintain retention. Sear should continue to contact hammer throughout movement. Pull trigger; sear should release hammer crisply. Trigger pull should he from 5 to 7 pounds. Release trigger. It should move positively to forward position under force of trigger spring and be held there firmly and without shake even when sear is not assembled. When trigger is in forward position and hammer cocked, the sear should rest upon or above top of rear pedestal of trigger. **These are the Highlights.... More Info between the lines in the Link.** Also like to add how impressed with how you carried yourself. You asked, pondered replies and IMO, thought out your plan and took it step by step. Now finish up the safety testing. After knowing you have everything Ironed out...... Let us know how she shoots. I may have missed it, but if I haven't Start a new post and introduce your WRA to us. We do love pictures. Again Congrats, Charlie-P777 ------------- Living Free because of those that serve..... |
Posted By: Mmr61184
Date Posted: May 10 2021 at 8:37pm
| throwing the old sear out and using the NOS one I got today. |
Posted By: New2brass
Date Posted: May 10 2021 at 8:51pm
|
before tossing, compare the sear pin hole between the 2. I was given a sear once that the hole was not formed correctly. Longshot, but nice to know for sure what the problem was ------------- http://www.uscarbinecal30.com/forum/club-assistance-saginaw-receivers_topic4716.html" rel="nofollow - Club Survey Saginaw Receivers |
Posted By: painter777
Date Posted: May 10 2021 at 11:27pm
|
I mentioned how sometimes it can be how 1,2 or 3 parts can affect each other. But I believe Wayne put it best: "There was just enough wear between the old sear and the old hammer that they were no longer compatible" Good Call Wayne  ------------- Living Free because of those that serve..... |